The Assess Visibility ArcGIS Pro project is used to understand how visible a proposed development will be from surrounding buildings. Observer buildings are sampled in 3D space and color-coded according to square meter of target visibility. Analysis results can then be shared as a 3D scene with other members in your organization.
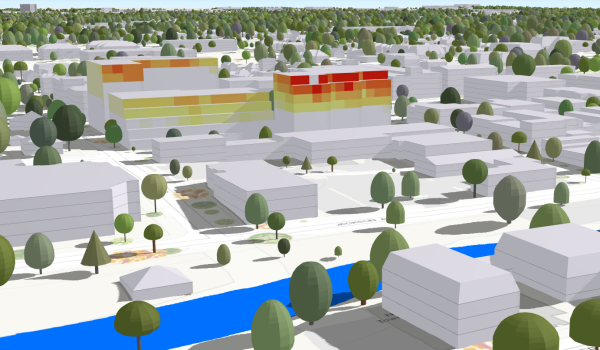
Alternatively, the Assess Visibility project can be used to determine what can be seen from the new development. For example, you can answer questions such as: how much of the river can be seen from the new buildings.
Assess Visibility
To assess visibility of, or from, a proposed development, complete the following steps:
- Open the AssessVisibility.ppkx in ArcGIS Pro.
- Sign in to your Portal for ArcGIS organization and make it the active portal.
- In the Project pane, expand the Tasks folder, then double-click on the Assess Visibility task. When calculating the visibility, enter the following:
- Observer features—These are the features that you wish to calculate the visibility from. For example, surrounding buildings if you wish to know the visibility of the proposed development from the surrounding buildings.
- Observer Panel Size—This is the size of the observer panels in meters.
- Target features—These are the features that you wish to calculate the visibility of. For example, a river if you wish to know the visibility of the river from the proposed development.
- Target Panel Size—This is the size of the target panels in meters.
- Obstruction Features—Select layers that potentially obstruct visibility. For example, surrounding buildings or trees.
- Obstruction Terrain—Select the terrain surface that potentially obstructs visibility (optional).
- Run the Apply Symbology From Layer task to symbolize the visibility panels of the (selected) observer features. The panel features class is called observerFeatures_panel and can be found in the project geodatabase. If you do not see the new layer properly, set the depth priority on the observerFeatures_panel featureclass.
- Double-click on the Publish Visibility Results task to share the result of the analysis on your Portal for ArcGIS account.
Author Visibility Results Scene
To author the Visibility Results Scene, complete the following steps:
- Sign in to your ArcGIS Online organization.
- Create a Scene using the 3D layers you published.
- Optionally, add an elevation service to the scene.
- Save the scene and share it with your organization.
Once you have finished publishing your scene, you can also share it with the Living Atlas.