Learn to use the Import Access Tables and Generate CCTV Pipe Features tools in the CCTV Manager solution.
Import Access Tables
The Import Access Tables tool imports CCTV inspection data from Access tables into file geodatabase tables for use in ArcGIS Pro.
To import Access tables and convert them to a file geodatabase, complete the following steps:
- Start ArcGIS Pro and create or open a project.
- On the Analysis tab, in the Geoprocessing group, click Tools
 to open the Geoprocessing pane.
 - Browse to the Utility Solutions toolbox. In the CCTV toolset, click Import Access Tables to open the tool in the Geoprocessing pane.
- For the Access Database parameter, specify the Access database with your CCTV inspection data.
- Choose the tables for the Tables to Import parameter from the checklist.
- Specify the File Geodatabase Location and File GDB Name parameters for the tool output.
- Choose Import Data and schema or Import schema only from the Import Options drop-down menu.
- Click Run.
Generate CCTV Pipe Features
The Generate CCTV Pipe Features tool enables you to generate spatial features from CCTV inspection data and condition tables. To create CCTV features, complete the following steps:
- Start ArcGIS Pro and create or open a project.
- On the Analysis tab, in the Geoprocessing group, click Tools
 to open the Geoprocessing pane.
 - Browse to the Utility Solutions toolbox, and in the CCTV toolset, click Generate CCTV Pipe Features to open the tool in the Geoprocessing pane.
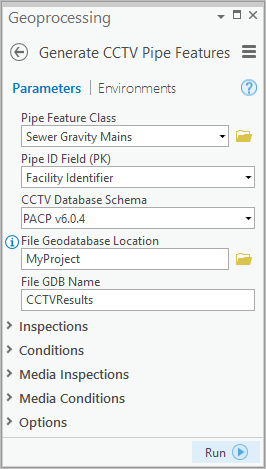
- Provide the required parameter information. The following screen capture provides an example of the parameter inputs:

- If CCTV Database Schema is PACP v6.0.4, PACP v7.0.7, or Custom, expand Inspections, Conditions, Media Inspections, and Media Conditions and fill in their respective tables. If CCTV Database Schema is ITpipes v1.5.43 , expand Pipeline, Inspections, Conditions, Media, Media Inspection and Media Conditions and fill in their respective tables.
- Expand Options and fill in any of the following optional parameters:
- Shape Length Field—Specifies the length field for calculations. If left blank, the geometry will be used instead.
- Inspection Name—Specifies the inspection name to store the resulting features.
- Video URL—Provides a path for video URLs.
- Media Folder—Specifies the storage location of CCTV media.
- Load Videos as Attachments—Specifies whether to load videos as attachments.
- If a map is not already open, click the Insert tab, and in the Project group, click New Map
 to open a new map.
 - Click Run.
The tool creates CCTV Conditions, Continuous Defects, and Inspected Mains features.
- Update the pop-up configuration to view all attachments, by browsing to the Contents pane, right-clicking Inspected Mains, selecting Configure Pop-ups, and verifying that the Show list of Attachments check box is checked.
Attachments are now visible in the Inspected Mains pop-ups.