Public-facing data collection applications require services that are accessible by the public, but there is often a need to protect that information once it has been submitted. Layer contents can be accessed two ways in ArcGIS Online: through the REST endpoint (service URL), and through applications such as ArcGIS Online Map Viewer and the configurable application templates.
Access to this submitted data can be controlled by setting up sharing permissions to restrict access to the REST endpoint, and by specifying the applications that can display the layers. These apps can then be configured to display only the data you'd like exposed to the audience of your application.
Protect the REST endpoint
To protect the contents of a layer, publish a layer that is shared with only your data managers, and then create a public copy of this private layer with stored credentials. This hides the REST endpoint from all users who do not have access to the private layer, while still allowing access to the public layer through ArcGIS Online maps and applications.
- Publish the layers you'll need for your application. Share these layers with only those accounts that will need full access to the data that will be stored within the layer. This will likely be a data manager group or the organization, or the layers could be not shared at all. These layers should not be shared with everyone.
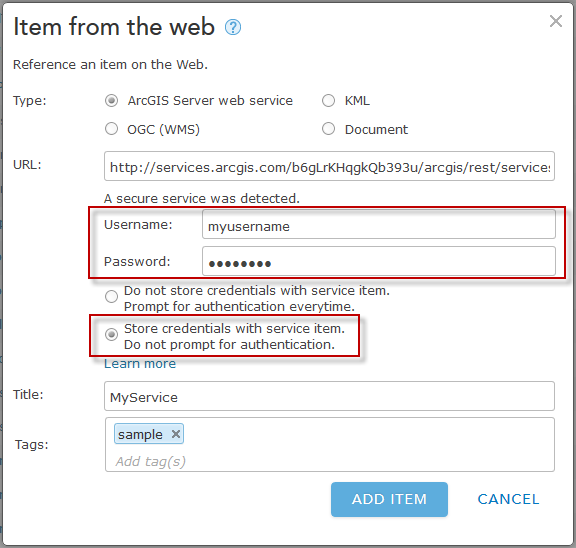
- Copy the service URLs of these private layers from the REST endpoint into a text file. For each of the layers, open My Content and click Add Item > From the Web > ArcGIS Server web service. Copy a URL from the text file and paste it into the URL parameter, and give the new layer a name and tags. When prompted, choose to store credentials with the layer. The credentials you use must be the user name and password of an ArcGIS account with access to the private layer.
- Share these layers with the intended audience of your application. In this case, it could be everyone.
- To confirm that the REST endpoint of your layers is protected, open the service URL of the public copy of the layer. You should only be able to access it when signed in to an account that has access to the initial private service. Accessing the Service URL anonymously or from an account that does not have access to the initial service should result in the message Token Required.
Protect the data
Although the REST endpoint is now protected, the layer's data can still be accessed through any ArcGIS Online web map; therefore, the data itself is not yet protected. To further restrict this access, specify which applications can access the layer. By limiting this access to specific applications that display specific content from the layer, you can choose which data from the layer to expose through a public application.
- Add one or more of the public layers to a web map and finish creating the map, including symbology and pop-up configuration. Save the map and share it with the intended audience of your application. This could be everyone, but should not be broader than the sharing permissions of the public service.
- Create and configure the web app that will present the map or maps, and share the web app with its intended audience. Copy the URL for the app into a text file.
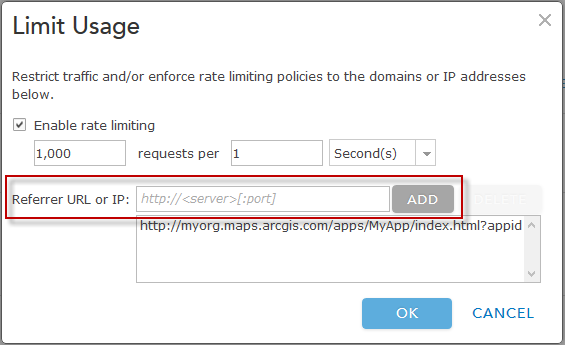
- Once the maps and applications have been created, open the item page for each public service and click the Limit Usage button in the Feature Layer Settings section of the Settings tab. Add the application URL to the list of accepted Referrer URL or IPs and click OK. This layer can now be accessed only through the listed application.
Modify maps that contain protected layers
Because the layer is now only accessible through your application, a few extra steps are required if you need to make changes to the maps that contain these protected layers.
- Unshare the public service so that no one else can access the layer's contents through a web map.
- Remove the app URLs from the list of Referrer URL or IPs. Once this list is empty, the layers will draw in the maps and they can be modified as necessary by an authenticated user with permissions to access the layer.
- Restore protection to the layer by re-adding the app URLs to the list of Referrer URL or IPs, and by resharing the layer.