The Utility Solutions Tools toolbox is a Python toolbox with toolsets for common utility workflows. Although the toolbox is not shipped with ArcGIS Pro, it can be installed using the Python Package Manager.
Create a Python project environment
To create a project environment using the Package Manager in ArcGIS Pro, complete the following steps:
-
Start ArcGIS Pro and click Settings
 .
.
- In the list of tabs on the left, click Package Manager.
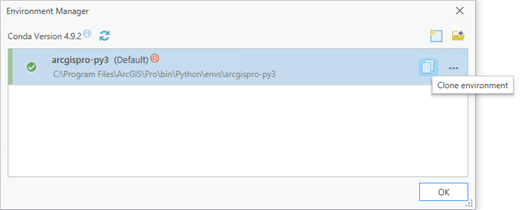
- In the upper right corner, click the Environment Manager button.
- Click the Clone environment button
on the row representing the environment you want to clone. Alternatively, click the Clone arcgispro-py3 button
to clone the default environment.

The Clone Environment dialog box appears.
- Select your newly cloned environment and click OK.
Cloning an environment may take several minutes. You can close the Clone Environment dialog box while you wait. You can monitor progress in the Tasks section of the Package Manager page.

Install the Utility Solutions Tools toolbox using the Package Manager
To install the Utility Solutions Tools toolbox using the Package Manager, complete the following steps:
- In the Package Manager, click Add Packages to see the Python packages that can be installed.
- Click Refresh
 to update the list of available packages.
 - In the Search box, type utilsolutions to find the Data Loading Tools toolbox.
- Select the utilsolutions package and click the drop-down arrow to update the version.
- Click Install to open the Install Package dialog box.
- Review the terms and conditions and check the check box to agree.
- Click Install to install the package.
- Once complete, close ArcGIS Pro.
The Utility Solutions Tools toolbox is installed, and the next time you start ArcGIS Pro, you can access it from the geoprocessing toolboxes.